
I love love love to cook! I love quick, easy, throw together in less than 10 minute meals, and I really love the ones that put me in the kitchen all day, preparing all of my fresh ingredients and making every tedious part by hand. But lets get real, with two kids, work, and a husband who is always either working, in school, or studying – that doesn’t get to happen often. So may happy place is in the middle. The ones that I can walk away from at an point to break up a toddler fight, the ones that I can cheat with and use pre-prepared ingredients (or whole parts), or if I am feeling brave, I can make by hand as well. These are the recipes I live for in this crazy, chaotic, messy life.
I made this particular one, this chicken pot pie, only two nights ago. And it was a HUGE success! So why do I call it the worst? Because here I am, two nights later, making it again. I am also slightly afraid I will be asked to make it twice a week for the entire summer. And I really hate eating the same thing over, and over again. This mama likes her variety! But, the husband requested, and I sort of like him – so I am here, making it again. And this time, I am documenting it in all of it glory to share with you! I originally found the recipe here through a late night Pinterest search, but as I always do, I have added my own flare, and taken some things away – I hope you feel like you can do the same to make it perfectly tailored to your needs!
I have a kitchen routine when I cook. First, I clean all my counters off – because today I’m doing it the long way! Don’t worry, I will tell you where you can, and I have, take shortcuts! So, counters are clean, there are no dirty dishes, and I have my apron on and hair up – OH and my wine poured 🙂 cuz what kind of cookin’ mama would I be without my glass of vino??

Now, I want to get all of my ingredients together, and measured out, for the crust. I always try my best to get all my ingredients ready before I actually start, because messy hands are inevitable, and I do not want to be touching every thing in my kitchen with yucky dough hands. I make some of the BEST buttermilk biscuits – I will have to share that one day too – and I learned the hard way about how much harder I make it on myself if I dont do it this way. I ended up with nasty dough hands, and irritated husband who was tired of getting called over to help, and biscuits that took forever to finish. So take my advice, and prep.
For this dough, I measured out my flour, sugar, salt, buttermilk, cut up my butter, and beat one large egg. took maybe 2 minutes for all of it. Worth it.

And now my friends, we do the dough thing. I love this part. I LOVE making dough of all kinds. Cookie, pie, pizza, bread, biscuit, ok… you get the point. I love sprinkling the flour on my counter, getting messy, and working with my hands. It makes me feel like a real, true, southern badass mama cookin’ barefoot in the kitchen 😉
I put all of the dry ingredients in a mixing bowl, whisked together to mix them well, the added in the cubed butter. Using my hands (see, messy dough hands!) I tosed the cubes to coat evenly. I then turned the mixture out on my counter, and with my hands pressed, mashed, and squished the butter in with the flour – ultimate messy dough hands! I used a rolling pin to ensure all ingredients were pressed and combined, and the dough took on a very flaky texture – yummy! I then put the dough back in the bowl, and put in the freezer for a bit to make sure the butter got nice and cold again. One thing about dough and butter, you must work fast. Keeping the butter cold and causing as little melting is key to delicious, buttery, flaky crust! I often will put in back in to chill, take it back out and work with it, and put it back in to chill again because mom life, and break means the butter gets too warm. So, keep the butter cold, work fast, use your hands sparingly when possible, and keep that butter cold!!


So, while my dough chills out in the freezer, I clean my counter again, clean up any empty cookware, and try my best to keep my kitchen clean along the way. Tonight, I also took the opportunity to get the little in her nightgown, and take a few savory sips of my cabernet. You could swap laundry, call your mom, hide in the pantry eating twizzlers (i personally have NEVER done this) – but the point is, take this break! Because you are about to rev it up again and get to work!
Let me also take this moment to tell you that two days ago when I made this, I used frozen deep dish pie crusts. No shame in my game. I had a busy, fun girls day out with my mom, sister, and little princess. So using frozen pie crusts was one of my hacks to cut prep time and make it a quick easy meal. So no shame! take the breaks in life where you can get them when you need them!
Ok, so. Get your nice and cold dough and add in the buttermilk. Using a spoon start to mix. The dough will be kind of firm and hard to work with right now – thats a good sign! Hard = cold butter! Eventually I use my hands to get it all mixed, and I just cant resist dough hands! Once totally mixed and everything is wet, separate into two balls and place on saran wrap. Wrap each ball, flatten slightly, and place in the fridge for now. Take a sip of whatever it is your drinking- ice water, sweet tea, a cocktail – whatever, just take a sip – the hard part is done!


So while the dough chills out again, lets start on the filling. First, Ill prep my ingredients. The chicken I cooked all day in the crockpot. I like to do my chicken that way when I plan on shredding it because it keeps it moist, and it shreds super easy. I like to throw it in in the morning before I leave, and then its super easy and fast to shred when I get home. Pair this trick with the frozen crust and you have a simple and quick to make meal! And use fresh herbs whenever possible! They taste better are are so worth the tiny bit of extra hassle. The peas are frozen for convenience. And you see all of the yummy goodness? The heavy cream, the butter… mmmmm… see, the worst chicken pot pie ever guys. If you’re looking for a meal to slim those hips, this just ain’t it. This is comfort food with lots of yummy guilty pleasure. But I don’t feel guilty at all, because I made it with my own two hands!!

Alrighty, now the part that will have your house smelling delicious in no time, and make those taste buds water! Throw the butter in a skillet, then sauté the onion, celery, garlic, and carrots until things start to soften a bit. Once things are getting soft, add in the flour, salt/pepper, thyme and parsley, heavy cream and chicken broth. Whisk together, scraping the bottom to get that flour good and mixed in! Once you get it all mixed up nice and good, let it simmer for a bit to thicken up – about 10 minutes. (Stir every now and then though!)


Now, while that’s simmering, have you been cleaning as you go? If not, go put those dirties in the dishwasher. No, not just the sink. Put them in the dishwasher, or go ahead and clean them by hand! Yes, you have time. The worst thing about cooking is the mess, and the worst thing ever is trying to enjoy your food, getting full and sleepy, and still having a messy ass kitchen. So, go clean! NOW!
People always say “how do you know if its thickened up?” my answer? If you’re asking, its not thickened. You’ll know it when you see it. You’ll be able to run a spoon through the pan and not have the mixture instantly fill the space behind it – it will slowly fill the space, but not instantly like thin liquid would.

Once you get to this point, stir in the chicken and peas. Remove the skillet from heat and set aside and turn the oven to preheat to 400 degrees- its time to roll out the pie crust!


Make sure you flour your countertop a decent amount, or the dough will stick and rip a hole when you’re ready to lift it into your pie dish! That always grinds my gears like none other. Go ahead and grease your pie dish too, you don’t wanna have to worry about that with dough hands. Once you are ready, set of of the dough circles on the floured counter. I use my hands to mush it out into a pretty decent circle before using the roller. Rolls your dough out to a large enough circle, taking care not to let it get too thin in any area. then, carefully lift and place in pie dish. Press into dish, and use excess off the edges to help fill any holes you may have ripped. NO one will see this inside layer, so it doesn’t have to be pretty, it just has to hold up!! Then, fill with the chicken mixture. Is your mouth watering yet? Mine is! Now roll out your second dough circle, and place on top of pie. Use hands or fork to crimp edges, use a sharp knife to cut a few slits in the top. Use that egg from wayyyyy back to brush over top of dough and along edges. This makes it golden brown and beautiful!


Place on cookie sheet, and bake for about 40-45 minutes on 400!
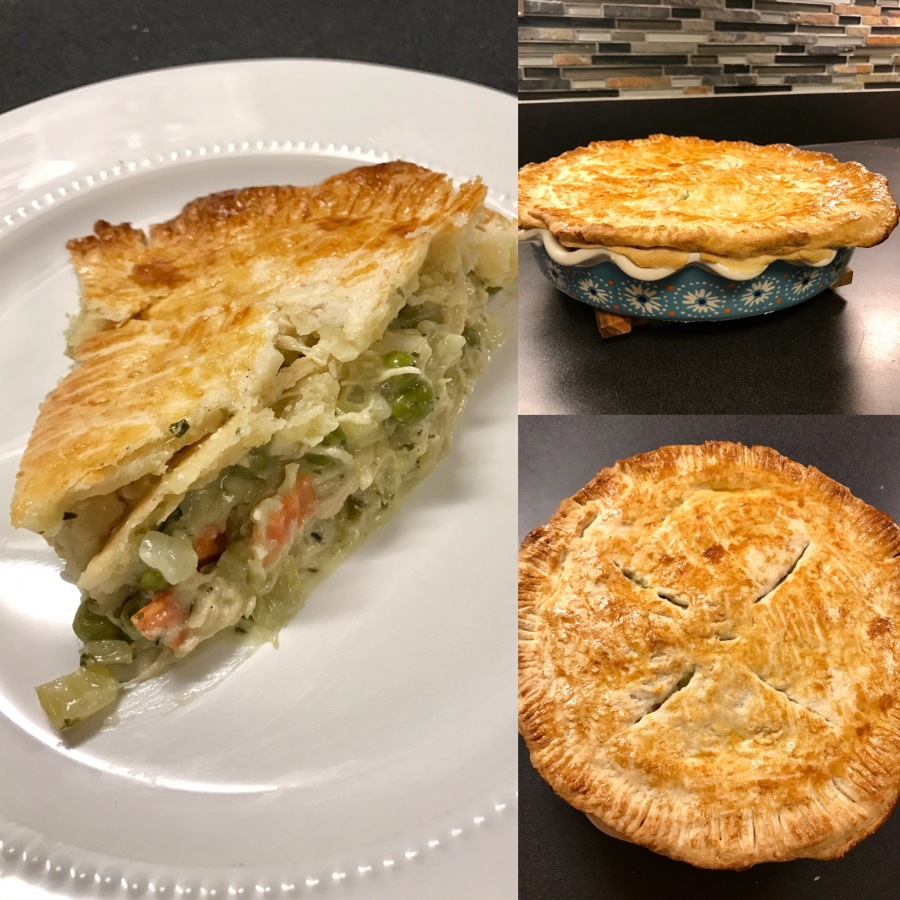
Look how beautiful! I hope you enjoy this as much as we do around here!

I would LOVE to hear what you think! Let me know how yours turned out, and share pictures!
TIP: I love the leftovers, but food like this can get a bit dry – so I add a splash of milk to mine before I microwave and it does the trick just fine!
The Worst Homemade Chicken Pot Pie
The worst chicken pot pie because with the perfect buttery, flaky crust and the gooey delicious filling, you simply won't be able to stop eating it - or making it!
Credit: Two Peas and Their Pod
Ingredients
- Crust
- 2 1/2 cups all purpose flour (plus extra for dusting countertops)
- 1 tablespoon sugar
- 1teaspoon salt
- 1 cup cold butter (cut into cubes then place back in fridge until ready to use)
- 1/2 cup buttermilk
- 1 egg, beaten (for egg wash on crust before baking)
- OR you could buy a frozen and scrap this entire part of the recipe
Filling
- 1/4 cup butter
- 1/3 cup onion, diced
- 1 cup chopped carrots (I buy the round slices and cut those in half to save time)
- 1/2 cup chopped celery
- 3/4 cup frozen peas
- 2 cloves garlic, minced
- 1/3 cup flour
- 2 teaspoons fresh thyme, minced
- 1 tablespoon fresh parsley, minced
- 1 teaspoon salt
- 1/2 teaspoon pepper
- 2 cups chicken broth
- 3/4 cup heavy cream
- 3 cups shredded chicken (I like to cook mine in the crockpot all day to make perfectly moist chicken that easily shreds) OR you can buy a rotisserie chicken and save even MORE time
Directions
- Start with the crust. Mix dry ingredients in a medium-large mixing bowl. Then, toss cubed butter to coat evenly. Pour mixture onto clean surface, and work with hands, mixing butter into mixture. Work quickly to avoid melting butter. Once mostly incorporated, use rolling pin to press butter out into sheets, regathering mixture and re-rolling as needed until mixture is even and well combined. Texture should be very flaky. Return to bowl, and place in freezer for about 15 minutes to re-chill butter.
- Once chilled, remove from freezer and add buttermilk. Using a spoon and/or hands, incorporate into mixture evenly until it forms a ball. Divide dough into two halves, flatten into disks and wrap in saran wrap and place in refrigerator to chill while the filling is made.
- Now cook the filling. Melt the butter in a large skillet on medium-high heat. Add onion, celery, garlic, and carrots to skillet and sauté until tender. Using a whisk, add flour, salt, pepper, parsley, thyme, broth, and cream. Whisk, scraping bottom of pan, until no lumps are present. Allow to simmer on medium-low heat until mixture has thickened – approximately 10 minutes – stirring occasionally. Once thickened, add chicken and peas and mix well. Remove skillet from heat and set aside. Preheat oven to 400 degrees.
- On lightly floured surface, roll out each dough disk separately into 12 inch circles. Be careful not to make too thin in areas. Transfer one circle to greased pie dish. Press to bottom, repairing holes as needed, and trimming excess dough off edges. Fill pie with filling from skillet. Place second dough circle on top and crimp edges together with fingers or fork. Using a sharp knife, slice a few slits in the top of the pie to allow steam to escape while cooking. Lastly, brush top of dough and edges with beaten egg.
- Place on cookie sheet (to collect any spillage) and bake at 400 degrees for 40-45 minutes. Allow to cool for about 15 minutes before slicing and enjoying the worst chicken pot pie ever.
*To reheat leftovers, add a splash of milk to serving before reheating to avoid from being too dry

